概要 プラグインマネージャーとは ドキュメント 前提:ディレクトリ構成 1. init.luaを作成する 2. lazy.nvimの設定ファイルを作成する 3. プラグインを入れてみる 4. 一回Neovimを終了して、再度開く 覚えておくコマンド ヘルプを開く ヘルプドキュメントを開く lazy.nvimのダッシュボード表示 まとめ
概要
プラグインマネージャー lazy.nvimの設定方法を紹介する。
やり方は2つあるが、1のやり方のほうがプラグインをきれいに整理できるのでこちらを推奨する。
- Structured Setup
- Single File Setup
特別詰まるようなところはなかったので、Neovim初心者はぜひ使ってみてほしい。
プラグインマネージャーとは
Neovimの「プラグイン」は、VSCodeでいうところの拡張機能である。
VSCodeは拡張機能を管理する方法がデフォルトで備わっているため意識する必要はないが
Neovimでプラグインを管理する場合は、その管理方法も選択肢が複数存在する。
lazy.nvimはそんな複数存在するプラグインマネージャーの1種である。
ドキュメント

前提:ディレクトリ構成
最終的には以下のディレクトリ構成となり、
spec1.luaなどがlazy.nvimで管理する対象のプラグインファイルとなる。
~/.config/nvim
├── lua
│   ├── config
│   │   └── lazy.lua
│   └── plugins
│       ├── spec1.lua
│       ├── **
│       └── spec2.lua
└── init.lua
1. init.luaを作成する
Neovim設定の要である init.luaに以下を記述。
-- ~/.config/nvim/init.lua
require("config.lazy")
2. lazy.nvimの設定ファイルを作成する
公式ドキュメントの内容なので、そのままコピーすればOK。
ポイントは①②でコード内に記載した。
-- ~/.config/nvim/lua/config/lazy.lua
-- Bootstrap lazy.nvim
local lazypath = vim.fn.stdpath("data") .. "/lazy/lazy.nvim"
if not (vim.uv or vim.loop).fs_stat(lazypath) then
  local lazyrepo = "https://github.com/folke/lazy.nvim.git"
  local out = vim.fn.system({ "git", "clone", "--filter=blob:none", "--branch=stable", lazyrepo, lazypath })
  if vim.v.shell_error ~= 0 then
    vim.api.nvim_echo({
      { "Failed to clone lazy.nvim:\n", "ErrorMsg" },
      { out, "WarningMsg" },
      { "\nPress any key to exit..." },
    }, true, {})
    vim.fn.getchar()
    os.exit(1)
  end
end
vim.opt.rtp:prepend(lazypath)

-- Make sure to setup `mapleader` and `maplocalleader` before
-- loading lazy.nvim so that mappings are correct.
-- This is also a good place to setup other settings (vim.opt)
-- ポイント①:<leader>と呼ばれるキーを、スペースとして設定している
vim.g.mapleader = " "
vim.g.maplocalleader = "\\"

-- Setup lazy.nvim
require("lazy").setup({
  spec = {
    -- import your plugins
    -- ポイント②:ここで、pluginsというディレクトリ配下のプラグインを自動的に読み込むようにしている
    { import = "plugins" },
  },
  -- Configure any other settings here. See the documentation for more details.
  -- colorscheme that will be used when installing plugins.
  install = { colorscheme = { "habamax" } },
  -- automatically check for plugin updates
  checker = { enabled = true },
})
3. プラグインを入れてみる
今回はお試しとして を導入してカラーを変えてみる。
以下のディレクトリに追加する。
~/.config
└── nvim
    ├── init.lua
    └── lua
        ├── config
        │   └── lazy.lua
        └── plugins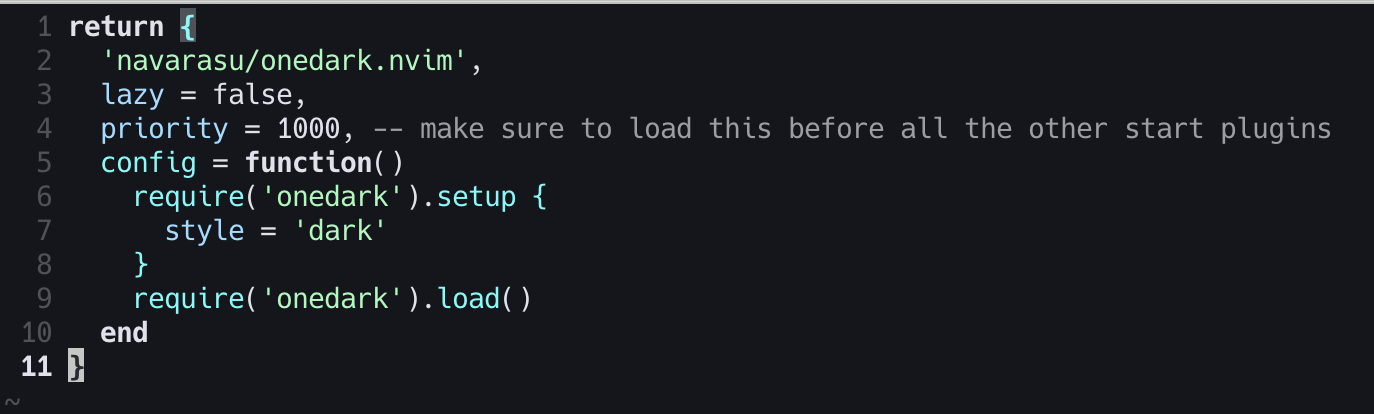
└── onedark.lua ←追加 onedark.luaの内容は以下の通り。(公式ドキュメントのコピー)
-- Using Lazy
{
  "navarasu/onedark.nvim",
  priority = 1000, -- make sure to load this before all the other start plugins
  config = function()
    require('onedark').setup {
      style = 'darker'
    }
    require('onedark').load()
  end
}
4. 一回Neovimを終了して、再度開く
配色が変わっていることが分かる。
もし反映されていなかったら、以下のコマンドでプラグインの更新ができる。
:Lazy update覚えておくコマンド
ヘルプを開く
:Lazy help
ヘルプドキュメントを開く
:h lazy.nvimlazy.nvimのダッシュボード表示
プラグインの一覧などを確認できる。
:Lazy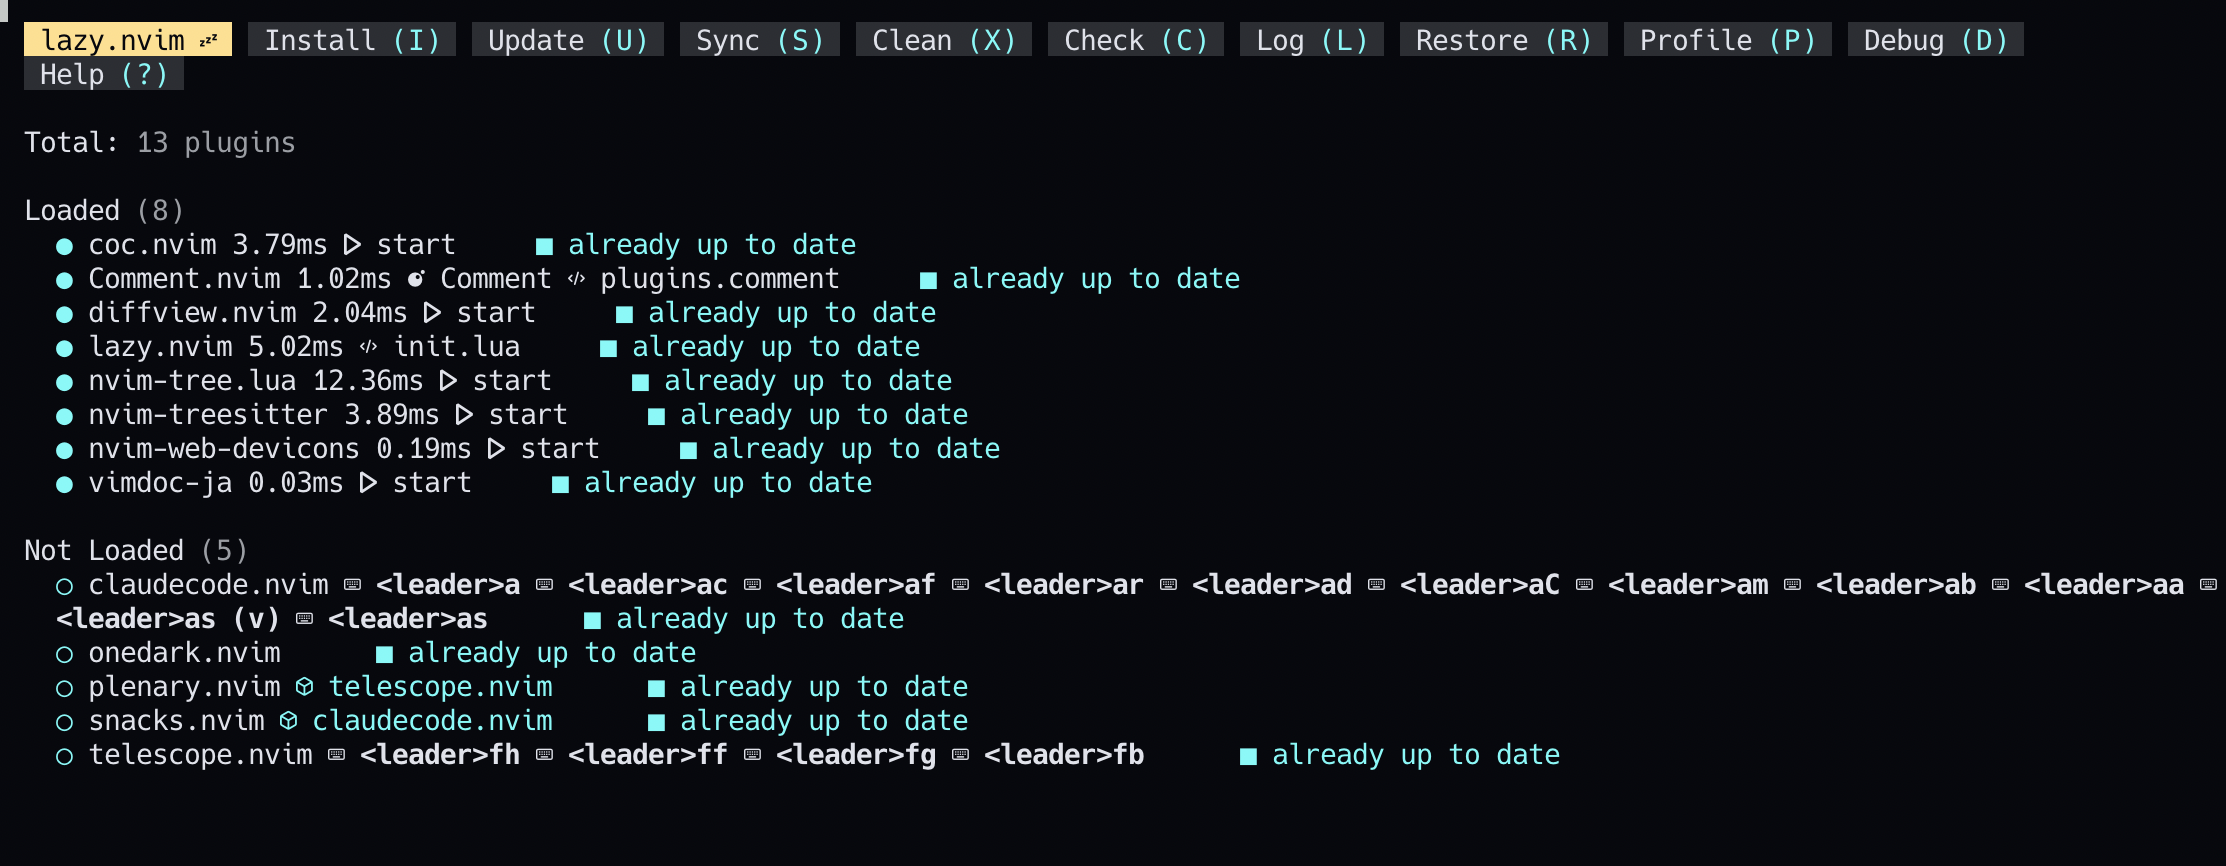
- Loaded:ロードされていて、今有効化されているプラグイン
- Not Loaded:まだロードされておらず、有効化されていないプラグイン
- スクショでは、
claudecode.nvimやtelescope.nvimは特定のコマンドが押されたときに初めて読み込むように設定してある - そのため、まだロードされていない扱いになっている
- スクショでは、
まとめ
公式ドキュメント通りに実施することで、簡単に導入することができた。
- configディレクトリに
lazy.luaを作成する -
init.luaから↑を読み込む -
pluginsディレクトリに、1ファイル=1プラグインという形で設定を追加していく